DIY Bat Garland Halloween Decoration
This DIY paper bat garland is a fun an easy craft that both kids and adults will enjoy creating. It makes for a great DIY Halloween decoration for at home, in the classroom or anywhere else that needs some spooky festive decor.

Disclaimer: This post may contain Amazon affiliate links. This means that at no additional cost to you, I may earn a small commission if you decide to make a purchase. For more information, please feel free to read the affiliate disclosure on our privacy policy page.
Halloween is always such a fun holiday to buy decorations for. However, if you have stepped into a store recently, you might be shocked to see how expensive some of these decorations can be!
While it can be nice to pick up a few holiday items each year, it can also be really fun to create some on your own. This bat paper chain craft is perfect for decorating your house, your classroom, a library or any other area that needs to feel some of the spooky spirit!
It is an easy craft that kids and adults will both equally enjoy. With just a few simple supplies that you probably already have at home, you can make this bat paper chain for yourself.
Supplies needed:
- Black construction paper (Or any other color! Feel free to be creative!)
- Pencil
- Scissors
- Free Printable Halloween Paper Chain Template (Optional, available at the bottom of this post).
How to make a bat paper chain:
Below you will find a written out step by step tutorial. You can also watch the video below for a visual representation.
Step 1: Fold paper in half.
Fold the black construction paper in half longways. Next, cut the page in half. You will only be using one side per paper chain. You can use the other half to create a second paper chain and attach them together to create a longer chain.
I used a 9x12 inch piece of paper. However, you can use any size you have as long as the strip you are making the chain with ends up being a long rectangle.

Step 2: Fold in half three times.
Fold the rectangular strip of paper in half. Fold it in half again, and then again once more for a total of three times.
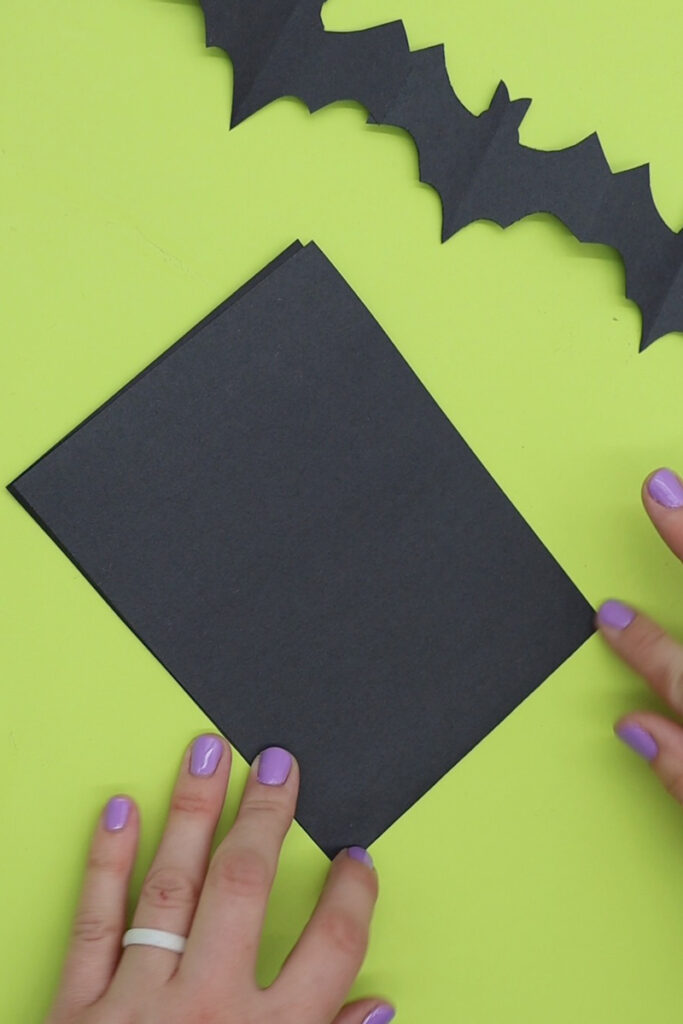
Step 3: Unfold, and then refold accordion style.
Unfold the strip of paper completely. Begin folding it again accordion style. Fold one section in, turn the page over and fold the next section in.
Important: After you have finished folding the paper, make sure that the right side of the top fold opens like a book. The left side will be the folded side and should not open.

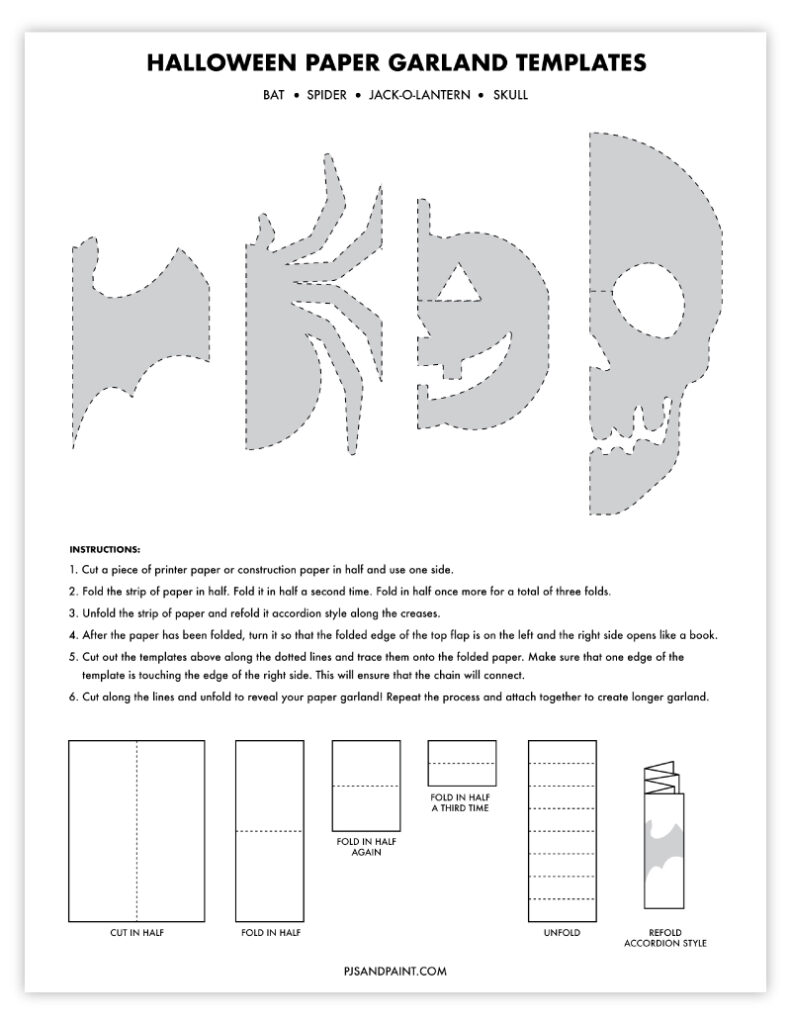
Step 4: Draw half of a bat.
The next step is to draw half of the bat shape. Be sure to have one side of the wing run off the side of the paper. This will ensure that the wings will connect together, forming the chain. If you would like a free printable template to help out with the drawing process, check out this post.

Step 5: Cut and unfold.
Cut along the lines that you just drew. Finally, unfold the paper to reveal your bat paper chain! Four bats should appear. If you would like to make a longer chain, simply repeat the process and connect multiple chains together using glue or tape.

More Halloween Paper Chains:
- How to Make a Frankenstein Paper Chain
- How to Make a Skull Paper Chain
- How to Make a Ghost Paper Chain
- How to Make a Pumpkin Paper Chain
- How to Make a Spider Paper Chain
- How to Make a Paper Spider Web
By entering your email address you will be receiving the free digital file as well as subscribing to our weekly email newsletter. You may unsubscribe at any time.