Frankenstein Paper Plate Craft | Halloween Paper Plate Crafts
Learn how to make this super cute Frankenstein paper plate craft. Using minimal supplies, you can create a fun Halloween craft the kids will love!

Something about Halloween just gets me in the mood for more crafting! Candy corn, pumpkins, ghosts, vampires and more! There are so many fun and spooky Halloween characters to create that the crafting possibilities are really endless.
Lately, I have been exploring the world of paper plate crafts. I never really knew how many things you could make out of a simple paper plate. From cutting them to painting them, gluing things on and more. This year, I've created a ton of fun and easy paper plate crafts that both kids and adults will be sure to enjoy.
These crafts are great for the classroom, holiday parties, at home activities or really anytime you or your kids are in an artsy mood.
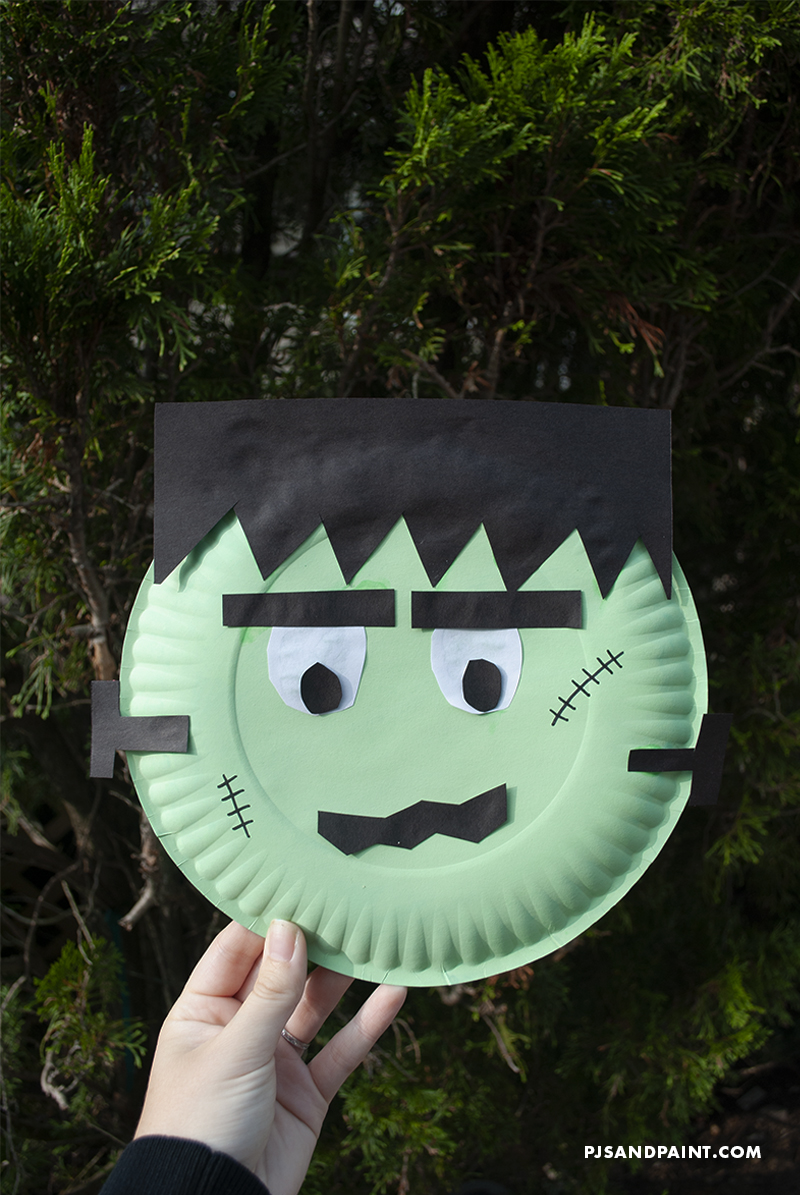
Today, I am sharing with you my super simple Frankenstein paper plate craft. After you are finished, you can hang the creature on your wall, on the fridge, on a door or any other place you need some fun Halloween decor.
The supplies needed are minimal, (You probably already have everything on hand!) and it only takes a short amount of time to put together. Your kids will have a blast creating their very own Frankenstein and if the adults want to join in the fun, even better! I know I was loving creating one of these for myself!
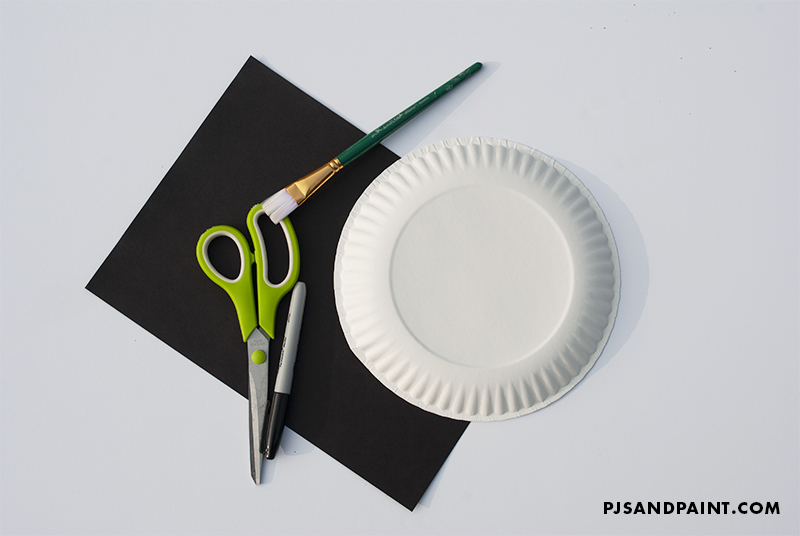
Materials needed:
- Paper plates
- Green paint
- Painbrushes
- White construction paper (or printer paper)
- Black construction paper
- Glue
- Scissors
- Black sharpie marker
Fun fact, I had a bunch more progress photos of me and my son making this Frankenstein paper plate craft. When it came time to photograph, I made the mistake of taking my mini studio outside. I ran in for half a second to get one more item and by the time I came back out my two year old had thrown everything but the final Frankenstein project into a bucket that had filled with rainwater from the night before.
Thankfully, he spared my final product!
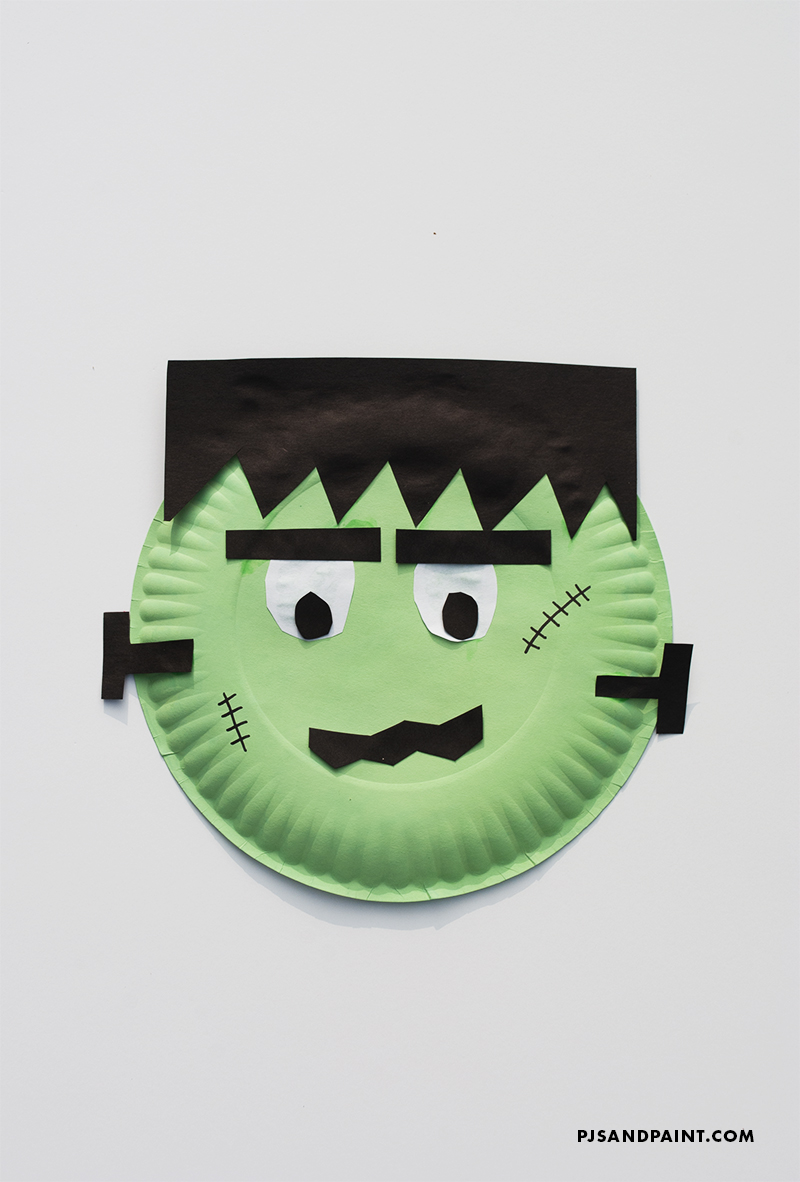
Anyway! The first thing you will want to do is begin paring the paper plate with green paint. I decided to flip the plate over and make that the "front."
Depending on the type of paint you are using, you may need to use two coats. Just make sure the first coat of paint is completely dry before moving onto the next coat.
While the green paint is drying you can begin cutting out the parts of Frankenstein's face.
Construction paper shapes needed:
- A zig zag hairline from black paper
- Two white eyes
- Two black pupils
- Two black eyebrows
- Two black bolts for his neck
- A mouth from black paper
Once everything has been cut out and the green paint has completely dried, then it is time to start gluing!
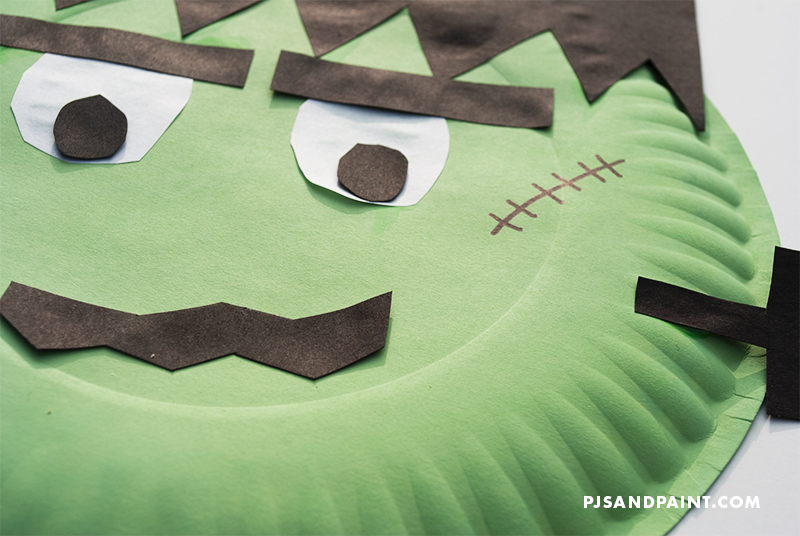
I began by placing Frankensteins black hair on top of his head. I used regular Elmer's glue for this project.
Next I glued down his two white eyeballs and two black pupils. After that I placed his two eyebrows right on top.
Add his mouth, and then place the two bolts on the sides of his face.
Finally, I took a black sharpie marker and drew a few scars on Frankenstein's face. And now your masterpiece is complete!
I really had a lot of fun putting together this Halloween craft. It was a great way to start getting into the Fall and Halloween spirit.
If you enjoyed this craft, you may also enjoy some of our other fun Halloween project tutorials below:
4 Fun and Easy Halloween Lollipop Crafts for Kids
These adorable (and spooky!) Halloween lollipop crafts would be the perfect project for the classroom, holiday parties, or simply something fun to do at home! With step by step tutorials on how to create pumpkins, spiders, ghosts and bats, the fun is endless!
7 Halloween Rock Painting Ideas
Rock painting is so much fun and you can find half of the supplies right in your own backyard! All you need are some rocks of any shape and size, paintbrushes and paint. Then it is time to get creative! Feel free to copy one of my ideas or experiment with your own. Candy corn, ghosts, monsters, mummies and more!
Popsicle Stick Pumpkin Craft
This easy popsicle stick pumpkin craft idea is a great way to get your kids into the Halloween spirit this upcoming fall season. Once the craft is complete you can turn it into a door hanger or even stick a magnet onto the back and place it on the refrigerator for some festive seasonal decor.
Terra Cotta Pot Pumpking Painting
This terra cotta pot pumpkin painting idea is great for not only home decor but for gifting as well. Whether you will be attending a Halloween party or would just like to bring a present to friends and family, this little decorative pot would make a great holder for some sweet Halloween treats.

I like the Frankenstein paper plate craft. It would look so cute hanging on the refrigerator. It would also look nice hanging in a window. What a cute way to have Halloween fun.